Why can't I see the menu in the header or footer?
Menus with links to unpublished pages will automatically hide the menu item until it is published.
Setup Instructions
To add menus to your website, first, you will need to set up the navigation menus, then you will need to select them in the template modules for the global header and footer.
POWER theme uses Advanced Menus that can be selected from a dropdown directly in the module once you have created the menus needed.
Set up Website Navigation Menu
Settings → Website → Navigation
To access the navigation settings, click the sprocket widget in the top bar of your HubSpot Account:
![]()
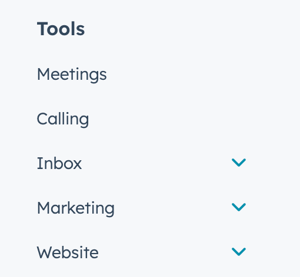
Then, on the left sidebar, scroll down until you see Tools then click on Website:
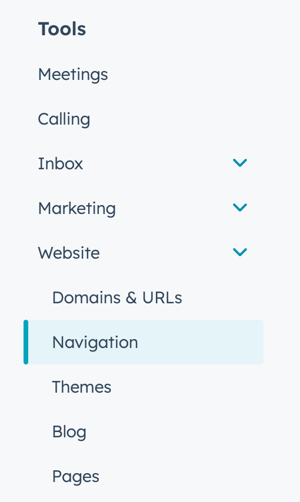
After the Website section is expanded, click on Navigation:
If you have not created a menu yet, the first thing you will do is click the "Create menu" button.

Next, you will give your menu a name. This name is internal only and does not display anywhere publicly. Choose something descriptive and easy to find, for example, "Header Main Navigation - Brand Name" to help differentiate it from other menus in the list.
If you already have a menu, you can click on the name of the menu to see a list of available menus to edit or click the "+Add menu" link to create a new menu.

For existing menus, you have the following actions available, including the option to clone a menu to make it easy to modify for mobile, footer, etc.:

Creating a menu with unpublished pages
More than likely you will be creating a menu for pages that are not published yet. Even if you have draft pages created, your menu won't display in preview mode if the link is not published.
To preview your menu in the global header and global footer and have it visible on pages while you are building website pages, you will want to create the structure, but instead of setting each item to connect to the page, you'll want to choose "No link" in the dropdown so that the menu structure will be visible.
Once you have created your pages, you can go back to update your navigation to associate all of the links and publish your site pages to make everything come together.
Make sure to review our Site Launch documentation for more tips on a successful launch!
HubSpot Knowledge Base detailed instructions to set up your navigation menus
After you have created the menus, you will need to configure them in the global header and global footer modules.
Add Navigation Menu to Theme Header
In the Next Steps, you'll follow step-by-step instructions to configure the global header for each page type, but here is an overview of how to select the menus that you've created within the header.
Global Header > Main Menu
The first option is to choose the Main Menu, this is the most common menu used for Header Navigation:

Then, you have the option to configure an optional menu for use on Mobile for the Hamburger. This is helpful for your site visitors if you have a fairly complex dropdown or mega menu structure on desktop, it can help them find what they need access to on mobile devices quicker.

Next, you can choose to add a menu to the Top Header (an optional smaller header above the main header):

Add Navigation Menu to Theme Footer
After you set up the Header, you'll follow step-by-step instructions to configure the global footer for each page type, but here is an overview of how to select the menus that you've created within the footer.
Global Footer > Main Menu
The first option is to choose the Menu, this is the most common menu used for Footer Navigation and is typically supplementary navigation to the one used in the Header (it's ok if they're the same):

Next, you have the option to include a legal menu:
